Simple mode
ON THIS PAGE
Aura Mixer has two views of the same mixer:
- Simple — your sounds on big, friendly faders with plain-English controls and most of the setup done for you. Built for getting a clean, separated sound fast, without learning any audio jargon.
- Advanced — the full mixing console (the rest of this guide): every knob, every tab, total control.
They are the same mixer underneath — not two separate setups. Anything you do in Simple shows up in Advanced and the other way round, and switching never loses a thing.
Simple is the default — it's what you see the first time you open Aura Mixer, on purpose. Each sound is one friendly card — level, mute and the everyday shaping blocks — and the detail that can misconfigure the audio (per-channel calibration, phase, dithering, the SENDS and SETUP tabs) stays in Advanced, so a newcomer gets a clean, separated mix in minutes. The menu bar is the same in both views, so Channels, Routing and Settings (including the engine's driver mode and buffer size, which carry their own warning) are always one click away.
Advanced unlocks everything. Flip the toggle and the full console appears — every knob and tab, plus the engine and routing controls Simple holds back. Because those can misconfigure playback, Aura Mixer gives you a heads-up the first time you switch to Advanced; but it's still one mixer, and Simple is always a click away.
Switching views. Use the Simple / Advanced toggle in the menu bar (top of the window) — it's there in both views. Your choice is remembered between sessions.
The layout

- Top bar — the OUTPUT device you're playing to (read-only here; change it in the Main bus's SETUP in Advanced, or from the Main card's device picker), a Sound setup button (see below), and a Sound on / Sound off button that starts and stops the audio engine (click it to toggle). Switch back to Advanced from the Simple / Advanced toggle in the menu bar.
- Your sounds (left) — one card per source, with a counter (e.g.
3 / 4— three of your four Free slots used). - Output (right) — one card per destination. Main L+R (your master output) is pinned to the right edge and always visible.
- If you have more cards than fit, a small ◀ 1 2 ▶ pager appears under the row.
Sound setup — your headphones and what to hear better
Sound setup (top bar) asks two plain questions and places the answers for you — no curves, bands or channels to choose.
1 · Which headphones do you have? Every pair colours the sound a little differently; picking yours flattens that out once, for everything you hear (it goes on your Main L+R output).
- Search by brand or model — the list narrows as you type, with the part you typed highlighted. Above the list you see how many models there are (or how many match), and you can sort by Most used, A–Z or Newest.
- Each row shows the actual correction curve, the model's name, who published it and how many people use it. Click a row to apply it. The list loads in pages — Show … more at the bottom brings the next ones.
- The card at the top, Currently on your headphones, shows what is applied right now, with a Remove button to switch it off.
- Can't find yours? Under the list: Import a measurement (.txt) turns a frequency-response file of your own (from squig.link, for example) into a correction, and Browse squig.link opens that site. The list only holds corrections that have been published, so a missing model is normal — importing is the way around it.
2 · What do you want to hear better? Pick what matters to you — Footsteps, Competitive, Immersive, Streaming, Music or Voice / Mic — and choose one of the curves offered for it. It layers on top of your headphone correction and goes onto the channel that carries your game or system sound. The Your sound card tells you which channel it used, and change channel moves it if Aura Mixer guessed wrong; it remembers your choice.
The curves come from the Workshop. How the kinds of curve fit together: Headphone corrections and sound goals.
Click Done (or ✕) when you're finished. The same headphone picker appears in the setup wizard's output step, so you meet it the first time you set the app up.
Adding a sound
The cards show the sounds you already have. To add one, open Channels in the menu bar and + Add a source — or repurpose a card from its ⚙ gear → Source. Either way you pick a type:
| Choose… | Captures… |
|---|---|
| Microphone / line-in | A hardware input — your mic or an instrument. |
| System sound | Everything your PC plays (a whole output device). |
| A specific app | Just one program — Spotify, a game, a browser — no virtual cable needed. |
| Player 🔒 | Plays a file, or a playlist of them — see Player. |
| Soundboard 🔒 | A grid of clips you trigger on demand — see Soundboard. |
| Generator 🔒 (Advanced) | A test tone or noise generator — configured in Advanced only, see Generator. |
Outputs work the same way (menu bar → Channels → OUTPUTS) — plus Recorder (free, no Premium gate), which writes a bus straight to a WAV file instead of playing it anywhere. See Recorder.
The Free version holds 4 sounds and 3 outputs (Main L+R plus two more) — the counter on each side (e.g. 3 / 4) shows how many you've used. A card beyond the limit is locked with a 🔒 until you upgrade.
A sound card, top to bottom
Each card is one source. Nothing is scattered around — everything sits in tidy blocks, and each processing block has its own ON / OFF button:
- Name — with an icon and colour. The ⚙ gear (top-right) opens its full settings (below). A card that's beyond the Free limit shows a 🔒 instead of the gear.
- Gate — ON/OFF plus three dials (Threshold, Attack, Release). Mutes the sound whenever it drops below the threshold — kills keyboard clatter and room hum between words.
- Comp (compressor) — ON/OFF plus Threshold, Ratio, Attack. Evens out the volume so quiet and loud moments sit closer together.
- EQ — ON/OFF, a small preset picker and a tone curve. The ⚙ gear opens the full 12-band editor — the same one Advanced uses — to drag bands, change type, add or remove, and save presets.
- 3D Surround — ON/OFF plus a preset picker. Places the sound around your head or widens it in stereo. The ⚙ gear opens a quick-edit window with the same diagram, position controls and Stereo / Binaural HRTF mode switch as Advanced. The Generic and Enhanced models are free; the measured Immersive and Custom models are Premium.
- Effects — a list of extra effects (reverb, delay, de-esser, noise suppressor and more). The ⚙ gear on this block adds, removes and reorders them. (Premium — Free shows a 🔒 Premium badge.)
- Fader + meter — drag to set the level; the bar shows it live. Double-click the fader to reset to 0 dB.
- MUTE — silences this sound.
Hover its name for a one-line, plain-English explanation — and every dial and ON/OFF button has its own tooltip too.
Turning a block ON for the first time loads a sensible starting point; from then on your own tweaks are kept. Gate, Comp, EQ and 3D Surround each have a small preset picker above their dials — pick one for a starting point, or Default at the top of the list to reset that block back to factory values.
The ⚙ gear — a sound's settings
The gear on a card opens everything else about that source:
- Name & look — rename it, pick an icon and a colour.
- Source — what it listens to: switch between a mic, system sound or a specific app, and pick the exact device or app (a virtual cable's device works here too, if you use one).
- Level — Pan (left/right placement) and Trim (input gain).
- Goes to — which outputs this sound feeds. Send it to Main L+R and a Streaming bus, for example; flip each on or off.
- Open in Advanced — jump straight to this source in the full console.
- Remove — delete the source.
The output cards
An output card is a destination — your headphones, speakers, or a feed to OBS/Discord:
- EQ and Limiter — tone shaping (with the same ⚙ full band-editor gear as sources) and a clip-protection safety net (on by default). Both free.
- A large level meter and a fader.
- A device picker — choose which headphones or speakers this output plays to.
- The ⚙ gear adds the rest: the output type (Physical — speakers, headphones or a virtual cable — Application (capture), a hidden helper that OBS or Discord can grab by name without any virtual cable, or Recorder), Auto-level (keeps loudness steady — Premium), and Sync (a delay to line audio up with video, with optional automatic clock-drift correction).
Main L+R is your master output. It's always there, pinned to the right, and can't be removed.
The Media tray
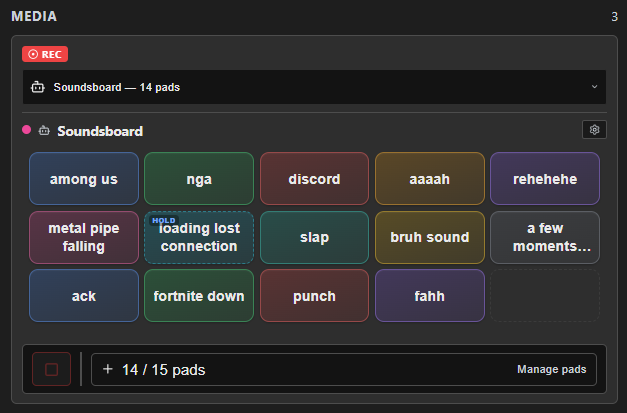
If your project has any Player, Recorder, or Soundboard channels/buses, a Media tray card appears above the output rack — a one-row dropdown listing all of them, with the selected one's full transport below:
- Player — Play/Pause/Stop, seek bar, loop, and (once it has a playlist) Next/Previous/Repeat/Shuffle.
- Recorder — REC/Pause/Stop, a live waveform, elapsed time and file size. A REC tag stays visible in the card's header any time a recording is running, even if you've since picked something else in the dropdown.
- Soundboard — the pad grid, a Stop button, and Manage pads.
The tray only appears if you have at least one of the three — a project that only uses regular sound cards never sees it. Regardless of what's selected in the tray, each one's own sound card (fader, mute, Gate/Comp/EQ/3D Surround/Effects) still works exactly like a mic's.
Free vs Premium in Simple
Locked features always show a visible 🔒 Premium badge — never a silent dead control. Click it to upgrade.
| Free | Premium |
|---|---|
| 4 sounds · 3 outputs (Main L+R + 2) | unlimited |
| Gate, Comp, EQ, 3D Surround (everyday model), fader, mute | + advanced spatial models |
| Output EQ, Limiter, device picker, Sync / delay | + the Effects rack on every sound |
| — | + Auto-level (loudness normalization) on outputs |
| Recorder buses (always free) | + Player, Generator, and Soundboard channels (build and configure freely on Free — they just stay silent until you upgrade) |
Full details: Accounts & Premium.
When to switch to Advanced
Simple covers the everyday 90%. Reach for Advanced when you want to:
- fold 5.1 / 7.1 surround to headphones, or choose a specific spatial model (Enhanced / Immersive / Custom HRIR),
- use VCA groups, per-bus SENDS, sidechains, or output loudness targets,
- fine-tune per-channel calibration (reference level, clip protection), dithering, phase or bus-to-bus sends.
The fastest route is a card's ⚙ gear → Open in Advanced, which lands you on that exact strip. And remember — flipping between Simple and Advanced never changes or loses your setup; anything you set in Advanced that Simple doesn't show is quietly preserved.